Set Windows 10 Default Apps Association via InTune
Use Policy CSP Features
Introduction
The Policy Configuration Service Provider enables companies to configure specific policies on Windows 10 beyond the default templates provided by the Device Management Portal. Of course it's a little bit more complex than using the template, but it gives much more functionalities. Here is a quick overview regarding how you can set default apps associations in Windows 10. This policy is applied at sign-in.
Before deploying your template to Intune, pay caution to the exact Windows 10 version that is installed on client devices... but InTune also has a feature to check the minimal Windows version, and another one to update your clients.
The complete reference / documentation is available on Microsoft Docs website.
Methodology overview
The general methodology is as follows:
On a Windows 10 device, configure the required apps associations
Export the said configuration to an XML file
Eventually modify or shorten the XML file
Convert the file into a base64 format
Upload the configuration to InTune
Step-by-step
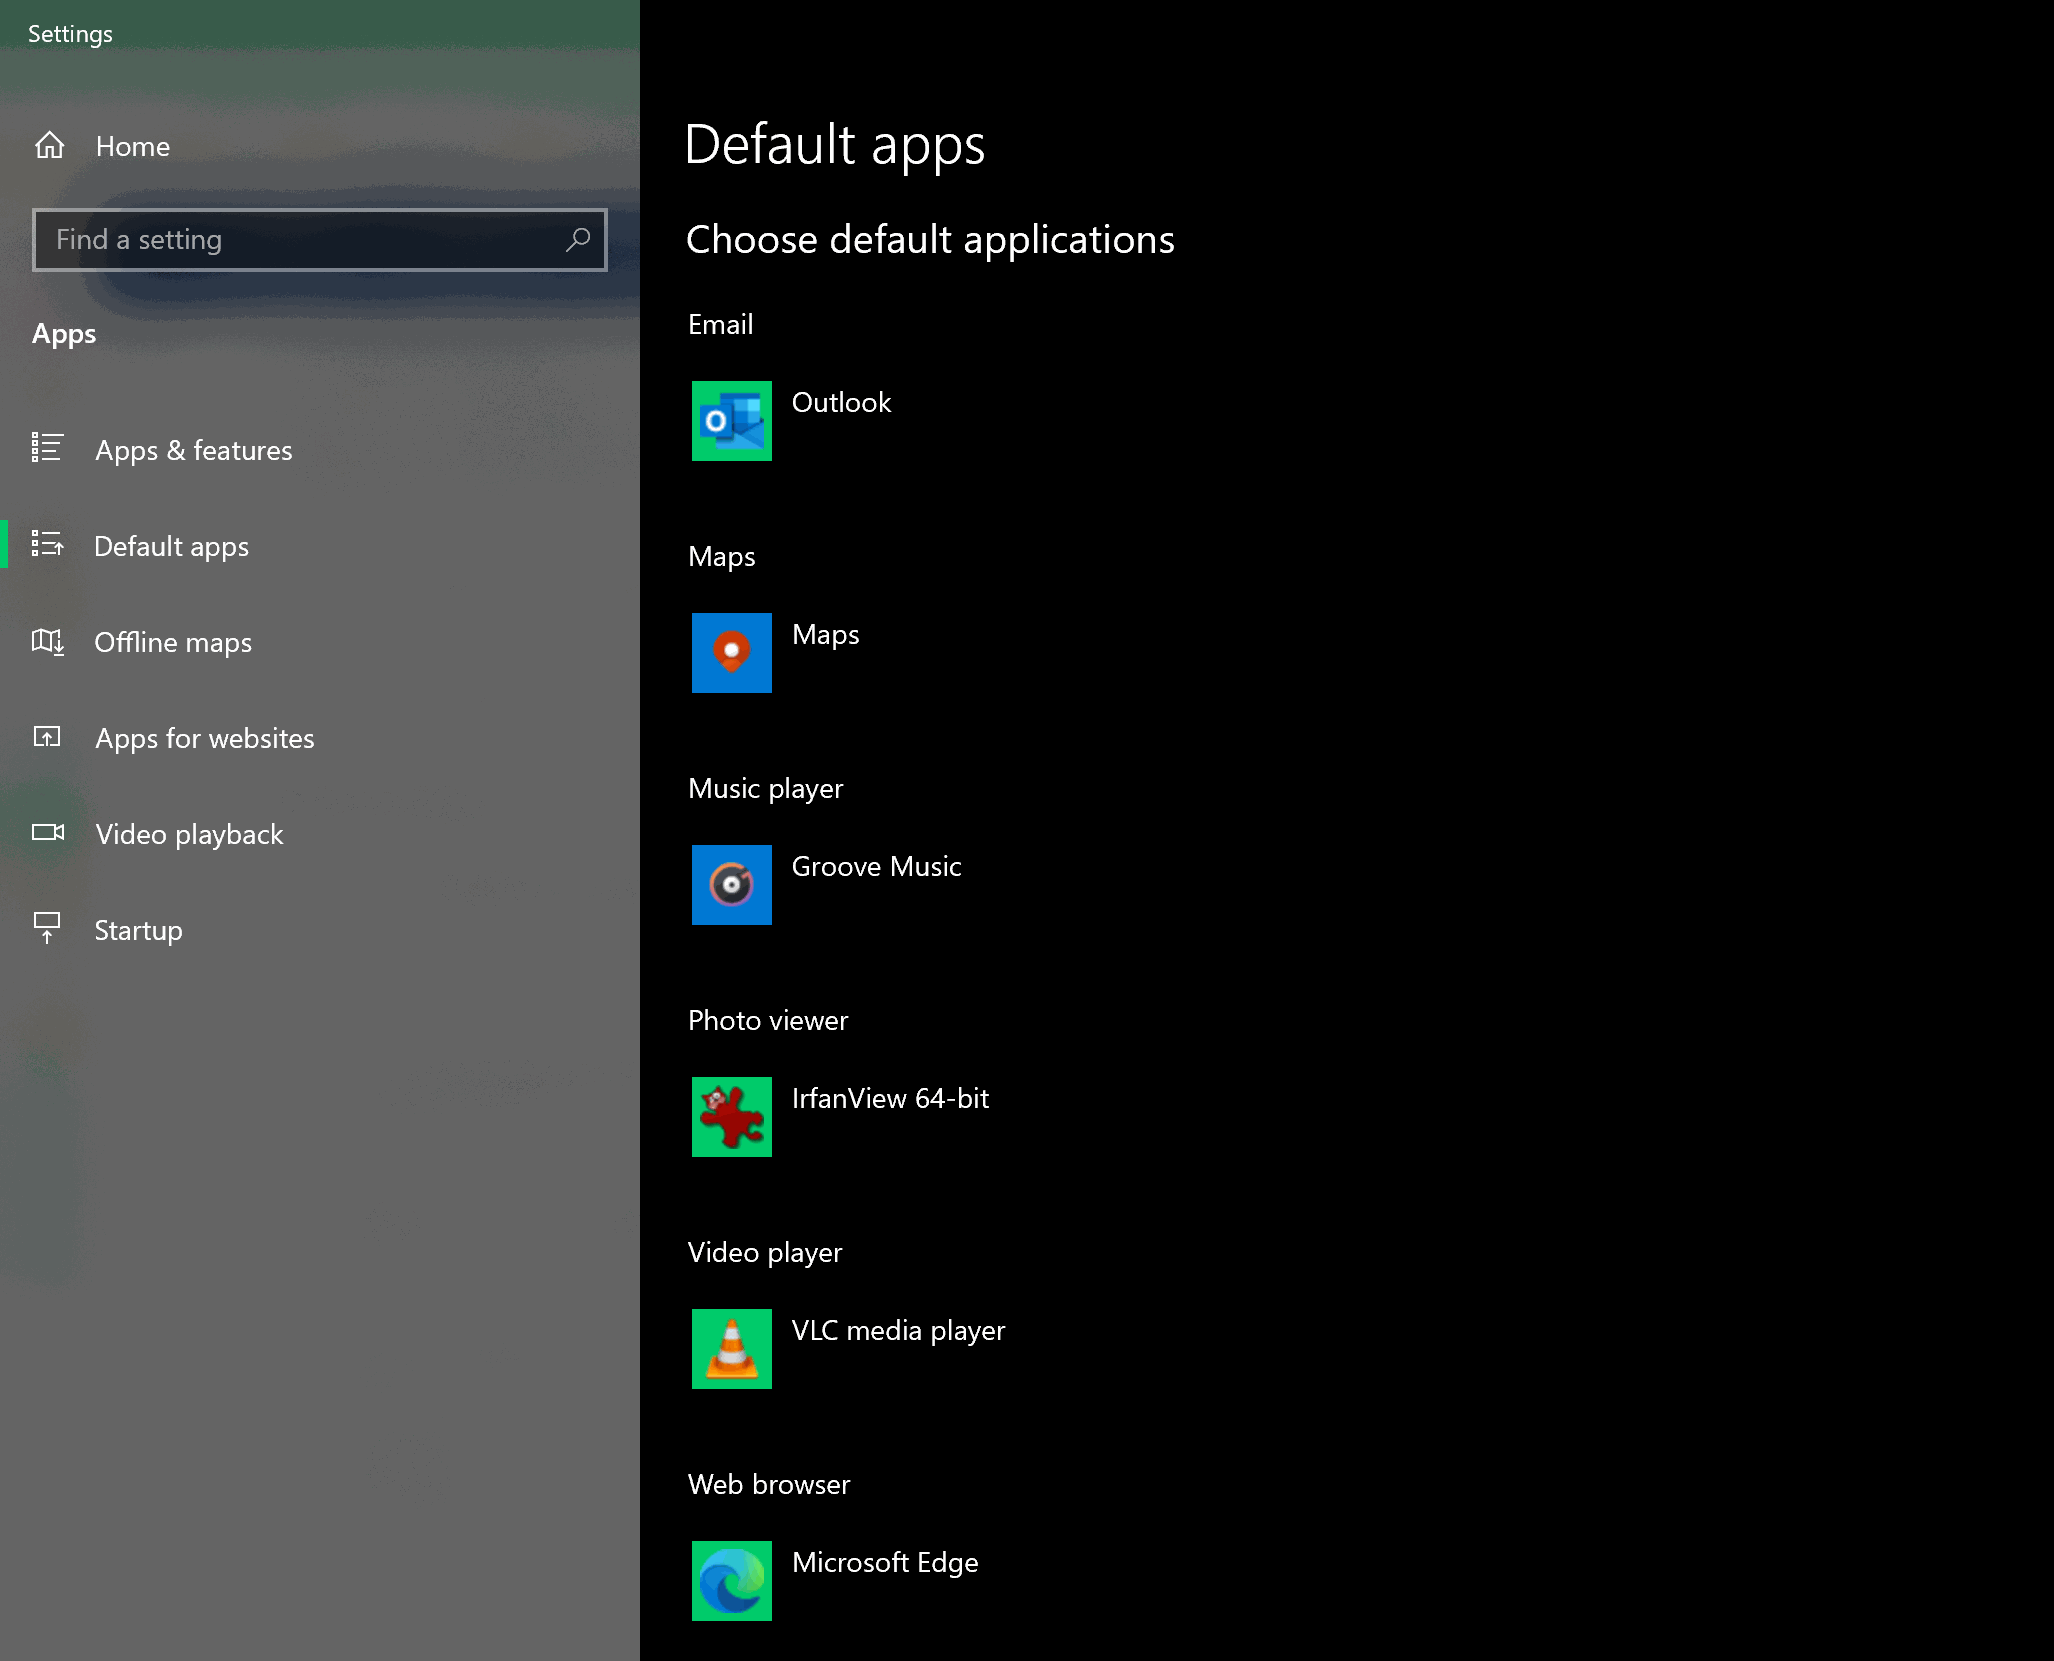
From a Windows 10 device, configure the default apps associations (Settings > Default Apps)
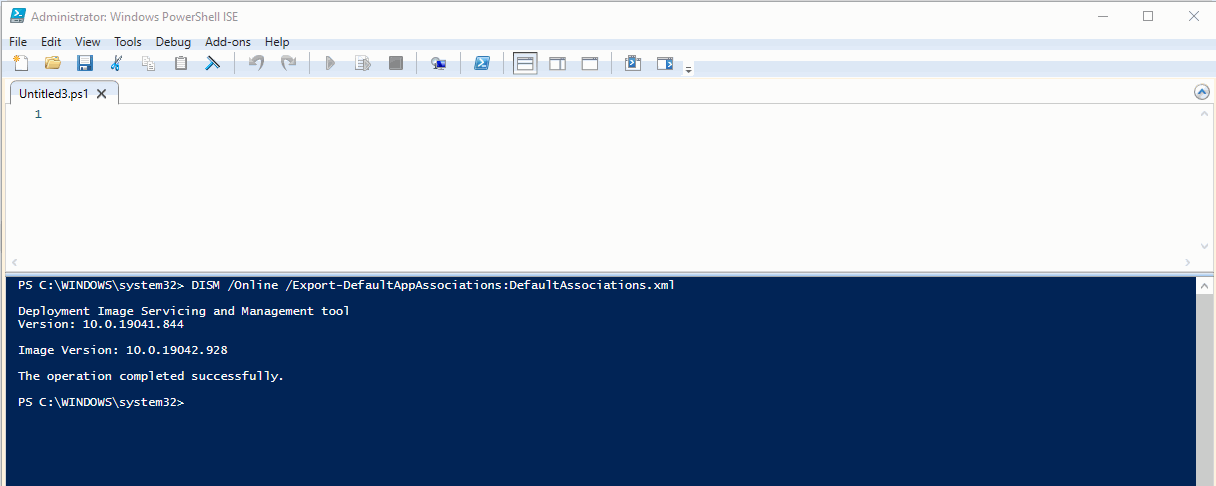
Open a command prompt to export the XML file with all apps associations and run the following command to create an XML file named "DefaultAssociations.xml" in the current folder. The name of the file itself doesn't matter.
DISM /Online /Export-DefaultAppAssociations:DefaultAssociations.xml
The generated file will look like this, and will most probably be much longer than the below sample. If you upload it as is, then ALL computers in your company will have the same apps associations than contained in the XML. Since you probably only want to define some associations only, just remove the line you don't need to deploy.
You should also make sure that the computers you deploy the policy actually do have the apps installed (this can also be achieved via InTune).
The below file will thus set Edge as default browser, Outlook as default mail handler and VLC as default media player.
<?xml version="1.0" encoding="UTF-8"?>
<DefaultAssociations>
  <Association Identifier=".htm" ProgId="MSEdgeHTM" ApplicationName="Microsoft Edge" />
  <Association Identifier=".html" ProgId="MSEdgeHTM" ApplicationName="Microsoft Edge" />
  <Association Identifier="http" ProgId="MSEdgeHTM" ApplicationName="Microsoft Edge" />
  <Association Identifier="https" ProgId="MSEdgeHTM" ApplicationName="Microsoft Edge" />
  <Association Identifier="microsoft-edge" ProgId="MSEdgeHTM" ApplicationName="Microsoft Edge" />
  <Association Identifier="microsoft-edge-holographic" ProgId="MSEdgeHTM" ApplicationName="Microsoft Edge" />
  <Association Identifier="ms-xbl-3d8b930f" ProgId="MSEdgeHTM" ApplicationName="Microsoft Edge" />
  <Association Identifier="read" ProgId="MSEdgeHTM" ApplicationName="Microsoft Edge" />
  <Association Identifier=".ics" ProgId="Outlook.File.ics.15" ApplicationName="Outlook" />
  <Association Identifier="mailto" ProgId="Outlook.URL.mailto.15" ApplicationName="Outlook" />
  <Association Identifier=".avi" ProgId="VLC.avi.Document" ApplicationName="VLC media player" />
  <Association Identifier=".divx" ProgId="VLC.divx.Document" ApplicationName="VLC media player" />
  <Association Identifier=".mkv" ProgId="VLC.mkv.Document" ApplicationName="VLC media player" />
  <Association Identifier=".mp4" ProgId="VLC.mp4.Document" ApplicationName="VLC media player" />
</DefaultAssociations>
When ready, the XML file need to be converted to Base64 format. There are a lot of sites and freewares that can achieve this conversion, a very good one is base64encode.org. Copy your XML in the top windows, select UTF-8 as format and CRLF as destination newline separator (since we'll deploy it on Windows devices). Hit Encode to get the result.
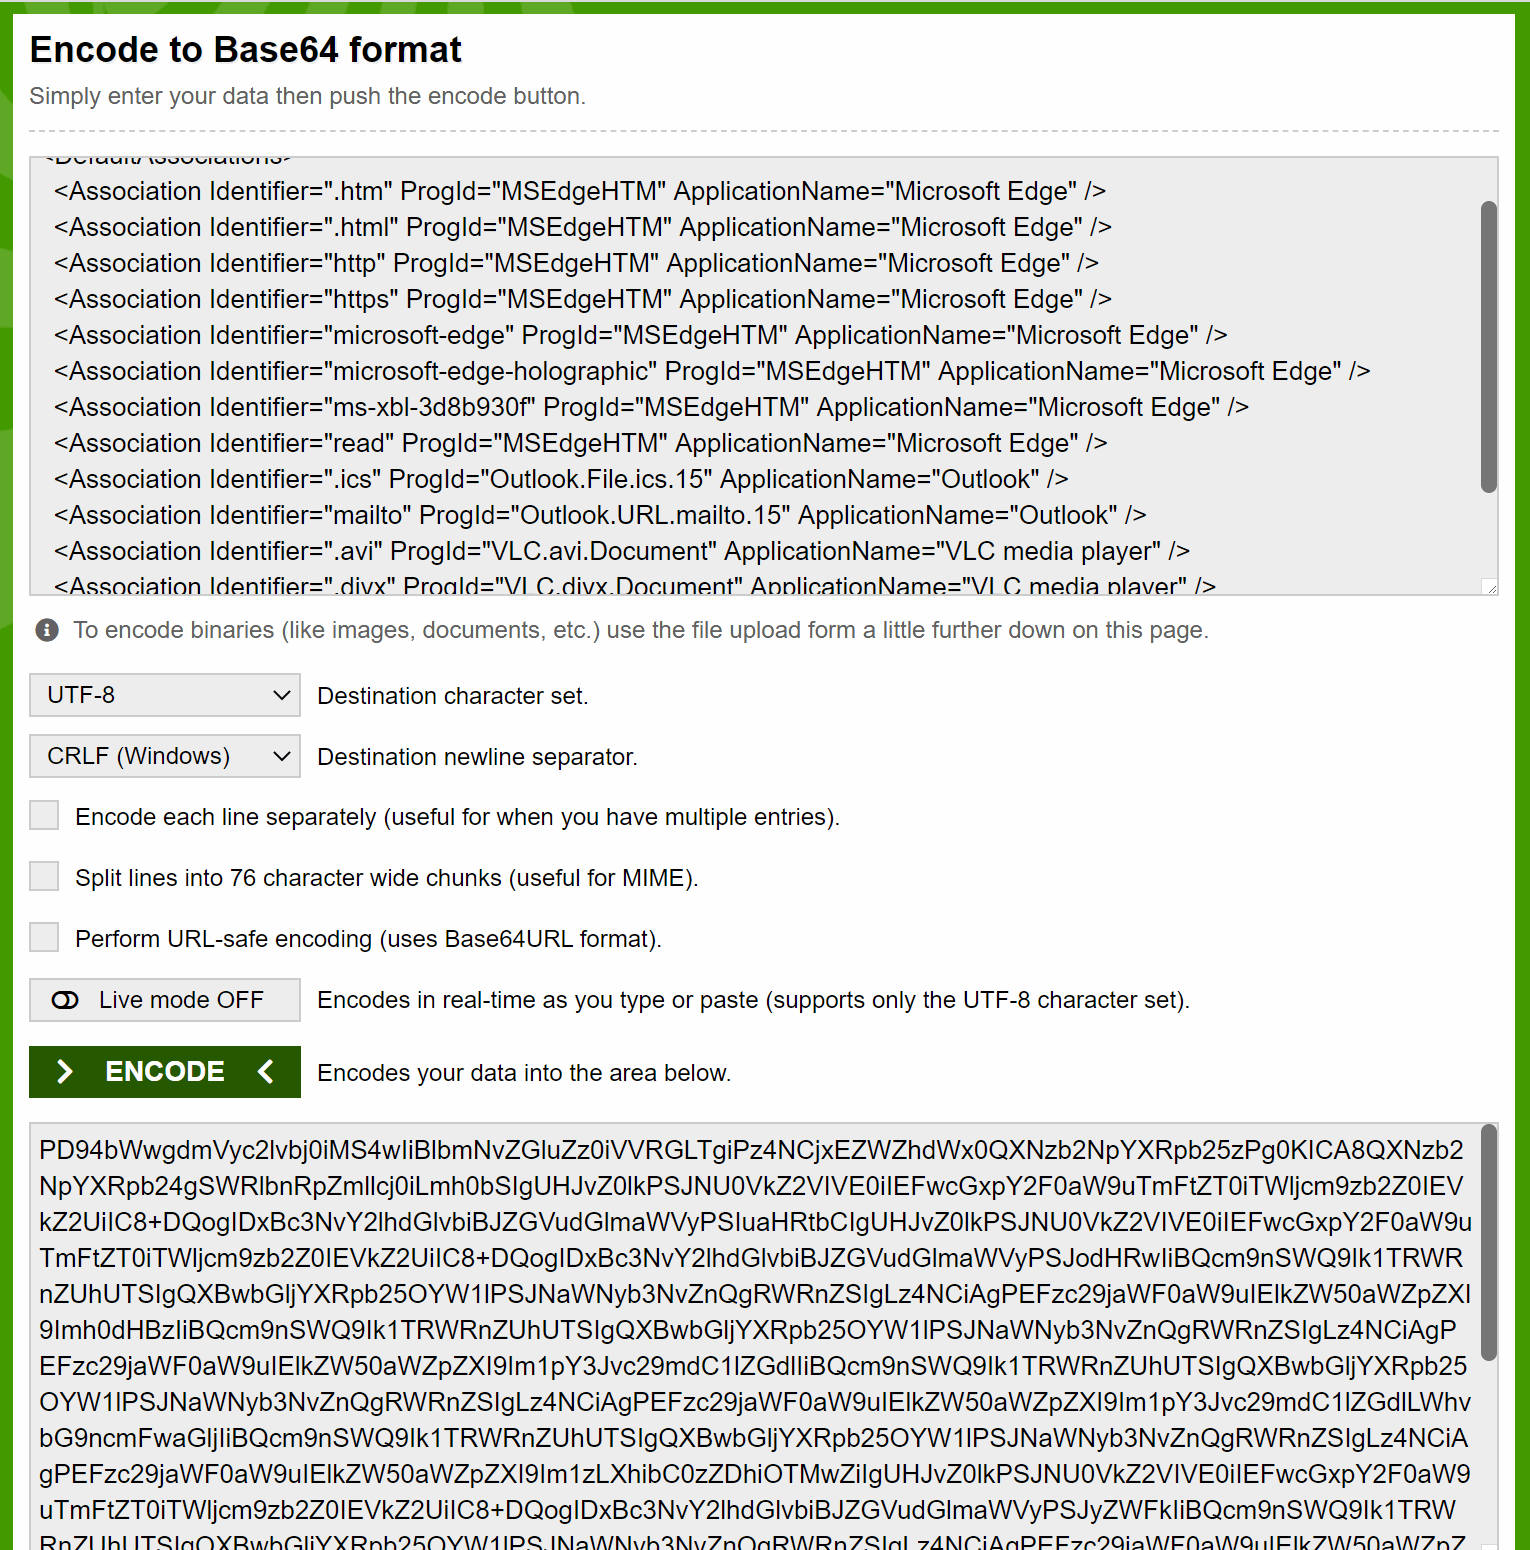
The output in the lower box will be the value to use in Intune.
Now, navigate to InTune and create a Device Configuration profile. Select "Windows 10 and later" as platform and "Custom" as profile Type. Give it a name then in the "Custom OMA-URI" Settings, use the following OMA-URI
./Vendor/MSFT/Policy/Config/ApplicationDefaults/DefaultAssociationsConfiguration
Set the data type as "String" and paste the Base64 encoded data in the "Value" Box, like thie
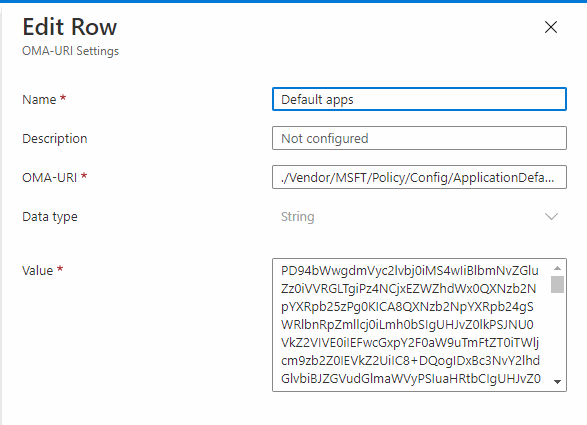
Save the profile, and assign it to Windows 10 devices to check